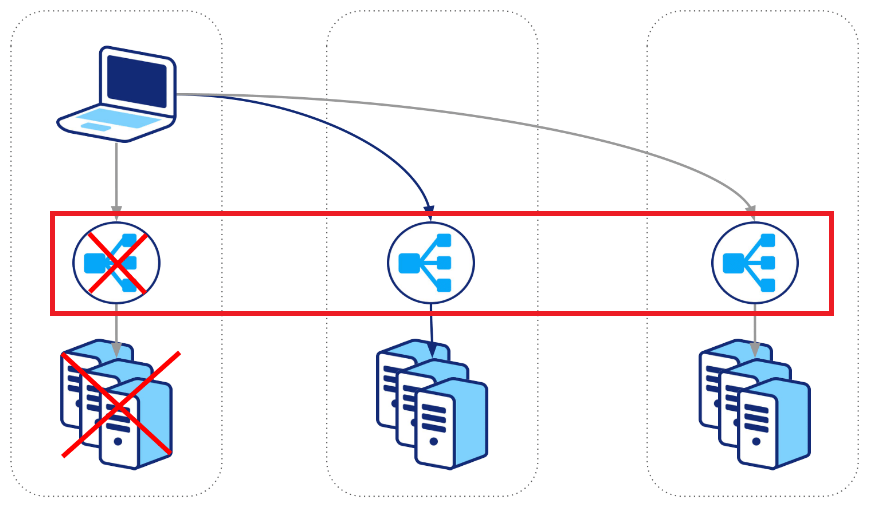
La combinación de Keepalived + HAProxy nos permite tener un entorno con alta disponibilidad (HA) para diferentes servicios al balancear su carga. En este caso, lo usaremos para un servidor web basado en Apache.
Para ello, podemos instalar y configurar 2 Raspberry Pi por igual, con diferente IP:
También necesitaremos una IP virtual (10.0.1.70) que irá balanceando entre los nodos en función de su disponibilidad
Mi recomendación es usar siempre 3 nodos como mínimo, pero en un entorno LAB, con 2 es suficiente. Usar 3.
Lo primero, será instalar el producto y librarías necesarias en ambos equipos:
apt-get install haproxy slirp4netns keepalived ipset libipset-dev -y
apt install apache2 software-properties-common ca-certificates apt-transport-https gpg lsb-release openssl
apt-get install apache2 php7.3 php7.3-mysql php7.3-curl php7.3-gd php7.3-imap php7.3-recode php7.3-tidy php7.3-xmlrpc -y
En RPI01 ejecutaremos:
cat <<'EOF' > /etc/keepalived/keepalived.conf
global_defs {
    lvs_id LB01                    # UNIQUE ID
    router_id LB01                 # UNIQUE ID
    enable_script_security
    script_user root
}

vrrp_sync_group SyncGroup01 {
    group {
        VI_1
    }
}

vrrp_script chkhaproxy {
    script "/usr/bin/killall -0 haproxy"
    script "/usr/sbin/service haproxy start"
    interval 9
    timeout 3
    weight 20
    rise 2
    fall 3
}

vrrp_script chkmysql {
    script "pidof mysqld"
    interval 2 # every 2 seconds
    weight 2
}

vrrp_instance VI_1 {
    interface wlan0
    state MASTER
    virtual_router_id 1
    priority 101                    # MAX PRIORITY
    advert_int 5
    #debug 2

    virtual_ipaddress {
        10.0.1.70
    }

    unicast_src_ip 10.0.1.71         # MASTER_IP_VALUE
    unicast_peer {
        10.0.1.72                    # BACKUP_IP_VALUE
    }

    track_script {
        chkhaproxy
        chkmysql
    }
    notify "/scripts/keepalived.sh INFO"
    notify_master "/scripts/keepalived.sh MASTER"
    notify_backup "/scripts/keepalived.sh BACKUP"
    notify_fault "/scripts/keepalived.sh FAULT"
}
EOF

service haproxy restart
service keepalived restart
En RPI02 ejecutaremos:
cat <<'EOF' > /etc/keepalived/keepalived.conf
global_defs {
    lvs_id LB02                       # UNIQUE ID
    router_id LB02                    # UNIQUE ID
    enable_script_security
    script_user root
}

vrrp_sync_group SyncGroup01 {
    group {
        VI_1
    }
}

vrrp_script chkhaproxy {
    script "/usr/bin/killall -0 haproxy"
    script "/usr/sbin/service haproxy start"
    interval 9
    timeout 3
    weight 20
    rise 2
    fall 3
}

vrrp_script chkmysql {
    script "pidof mysqld"
    interval 2 # every 2 seconds
    weight 2
}

vrrp_instance VI_1 {
    interface wlan0
    state BACKUP
    virtual_router_id 1
    priority 100             # MIN PRIORITY
    advert_int 5
    #debug 2

    virtual_ipaddress {
        10.0.1.70
    }

    unicast_src_ip 10.0.1.73         # MASTER_IP_VALUE
    unicast_peer {
        10.0.1.72                    # BACKUP_IP_VALUE
    }

    track_script {
        chkhaproxy
        chkmysql
    }

    notify "/scripts/keepalived.sh INFO"
    notify_master "/scripts/keepalived.sh MASTER"
    notify_backup "/scripts/keepalived.sh BACKUP"
    notify_fault "/scripts/keepalived.sh FAULT"
}
EOF

service haproxy restart
service keepalived restart
En ambos equipos, ejecutaremos:
groupadd -r keepalived_script
useradd -r -s /sbin/nologin -g keepalived_script -M keepalived_script

mkdir -p touch /scripts

cat <<'EOF' > /scripts/keepalived.sh
#!/bin/bash
echo "$(hostname -s) change STATE: $1"
EOF

chmod +x /scripts/keepalived.sh
chown root.root /scripts/keepalived.sh

service haproxy restart
service keepalived restart

ip a show wlan0
ip neighbour show

haproxy -c -f /etc/haproxy/haproxy.cfg
Hasta aquí ya tenemos el servicio funcionando.
Para visualizar estado y estadísticas podemos ejecutar lo siguiente, también en ambos nodos:
cat <<'EOF' >> /etc/haproxy/haproxy.cfg

listen stats
    bind :8080
    mode http
    stats enable
    stats hide-version
    stats refresh 30s
    stats realm Haproxy\ Statistics
    stats show-node
    stats auth admin:123456
    stats uri  /haproxy?stats
EOF

service haproxy restart

echo "" > /var/www/html/node.php
Ahora, configuraremos la alta disponibilidad para Apache:
En RPI01 ejecutaremos:
cat <<'EOF' >> /etc/haproxy/haproxy.cfg

frontend apache
   bind 10.0.1.71:81
   mode tcp
   option tcplog
   option  dontlognull
   default_backend apache2

backend apache2
   balance roundrobin
   mode tcp
   option tcpka
   server RP01 10.0.1.71:80 check weight 1
   server RP02 10.0.1.72:80 check weight 1
EOF

service haproxy restart
En RPI02 ejecutaremos:
cat <<'EOF' >> /etc/haproxy/haproxy.cfg

frontend apache
   bind 10.0.1.72:81
   mode tcp
   option tcplog
   option  dontlognull
   default_backend databases

backend apache2
   balance roundrobin
   mode tcp
   option tcpka
   server RP01 10.0.1.71:80 check weight 1
   server RP02 10.0.1.72:80 check weight 1
EOF

service haproxy restart
Para validar, tendremos 2 accesos. El primero, de forma nativa. El segundo uno creado de forma manual:
http://10.0.1.71:8080/haproxy?stats
http://10.0.1.72:8080/haproxy?stats

http://10.0.1.71/node.php
http://10.0.1.72/node.php
y por la IP virtual, podremos saber en que nodo está en un momento determinado:
http://10.0.1.70:8080/haproxy?stats

http://10.0.1.70/node.php